
 |
Supplies: - Base and accent polishes of choice. I used Ulta Wild Night for the base and Sally Hansen Celeb City for the tips - Striping tape in any color (I bought mine on ebay, just search "striping tape" if interested) - Scotch tape or painter's tape - Scissors |
 |
Step 1: - Apply desired number of coats of your base color - Allow polish to dry completely! |
 |
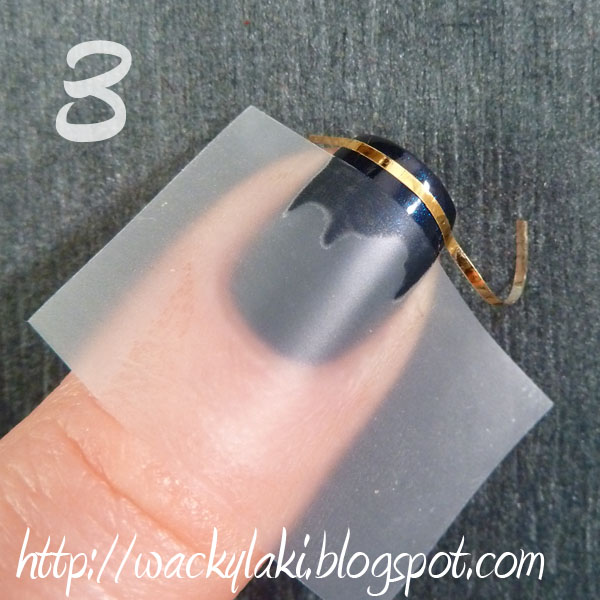
Step 2: - Once the polish is dry, apply a piece of striping tape a desired distance from the tip. |
 |
Step 3: - Place a piece of scotch or painter's tape a desired distance from the striping tape. |
 |
Step 4: - Paint the tip of the nail with the accent polish, making sure to cover all tape free areas of the nail |
 |
Step 5: - Carefully remove the scotch tape NOTE: Do not wait for the polish to dry, remove the tape right away. |
 |
Step 6: - Remove the striping tape to reveal the double lines - Add a top coat and you are done! NOTE: when doing a full manicure, paint and un-tape one nail at a time. Doing multiple nails at a time will increase the chance that the polish starts to set and the tape will not come off cleanly. |
I hope you enjoyed this quick tutorial. I would love to hear your thoughts or questions about it or if you try it! Also, let me know what you like/don't like about the tutorial so I can improve for next time :D
Thanks for looking!
Anutka :)

Great tutorial, thanks! :)
ReplyDeleteAwesome! Such a great idea :)
ReplyDeleteLooks good, I think I'll try that. :)
ReplyDeleteAlthough some of the text is missing, I did understand your tutorial :)
ReplyDeleteLovely tips, I'm going to try it too sometime :)
This is super cute! I recently got some striping tape, so I'll have to use it.
ReplyDeleteI have ordered this tape from eBay once, but never got it.. I will have to do it again, this looks perfect, thank you for the tutorial :)
ReplyDeleteI hope you don't mind me posting a link here, I just wanted to invite you to join my first nail polish giveaway :)
http://letspolishsomenails.blogspot.com/2011/12/my-100-followers-giveaway-open.html
I'm glad the tutorial was useful! I'd love to see your outcome if you try it :)
ReplyDelete@KimsKie, what did you feel was missing in the text? I would love to know so I can improve! :)
@Let's polish some nails. I have already posted about your giveaway on http://giveawayland.blogspot.com. :)
Great tutorial! You make it look so easy! Love the pics ~Alla
ReplyDeleteI agree-you make it look SO easy! I need to get sdme of that striping tape!!
ReplyDeleteI think it is easy, so make sure to give it a try! I'd love to see the results :)
ReplyDeleteI never tried it with removing the tape immediately...great suggestion!
ReplyDeleteI'm glad you found it useful. Let me know how it works out for you :)
ReplyDeleteI just found your blog and I am already loving it! I love your step by step tutorials. :)
ReplyDeleteThank you! I'm so glad you enjoy the tutorials! Let me know if you try one of them, I'd love to see :)
ReplyDeleteI did something kind of similar but my stripes were a tiny bit lower on my nail and not directly on the tip. I polished my nails with the silver polish and a top coat...once that was dry I put two strips of striping tape on and polished the dark blue polish and removed the striping tape immediately. I only did the stripes as accent nails on my ring finger and thumb. I got a lot of positive feedback when I posted a photo on facebook. Love love love striping tape for doing tiny stripes like this.
ReplyDelete@Kellie, there is always more than one way to do it for sure! I think striping tape is so fun :)
ReplyDelete